Resources
SmarkForm Forms — Agent Knowledge
Welcome! You’re about to fill out a form powered by SmarkForm, a technology designed to make form filling faster, easier, and more intuitive.
This guide will help you discover powerful features like keyboard shortcuts, smart navigation, and dynamic lists that will save you time and make the experience more pleasant.
New to SmarkForm? Don’t worry! These forms work just like regular forms, but with helpful enhancements. You can use them normally, or speed things up with the tips below.
SmarkForm-powered forms offer smooth keyboard navigation that helps you move through forms quickly and efficiently.
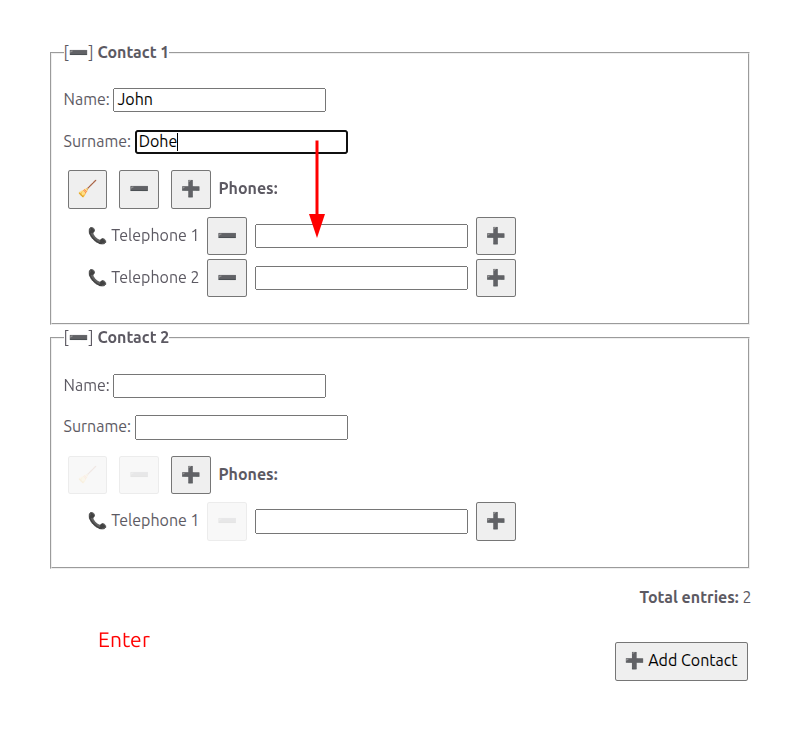
Use Enter and Shift+Enter to jump directly between form fields:
⏎ — Move to the next field⇧⏎ — Move to the previous fieldThis navigation is smart: it skips over buttons and other non-field elements, taking you straight to where you need to enter information.
Pro tip: This is much faster than using the mouse or tabbing through every element on the page!
If you need to navigate through all elements (including buttons and links), use the standard Tab key:
↹ — Move to the next element (fields, buttons, links)⇧↹ — Move to the previous elementIn multiline text areas (textarea fields), pressing Enter adds a new line within the textarea as usual. To move to the next field instead, use:
Pro tip: You can consistently use Ctrl+Enter and Ctrl+Shift+Enter to navigate through fields from anywhere, regardless of field type!
One of SmarkForm’s most powerful features is context-aware keyboard shortcuts (hotkeys) that let you perform actions without reaching for your mouse.
To see which keyboard shortcuts are available at any moment:
Press and hold the Ctrl key (or Cmd on Mac) ⌨️
While holding Ctrl, you’ll see visual hints appear next to buttons showing their keyboard shortcuts. Release Ctrl to hide the hints.
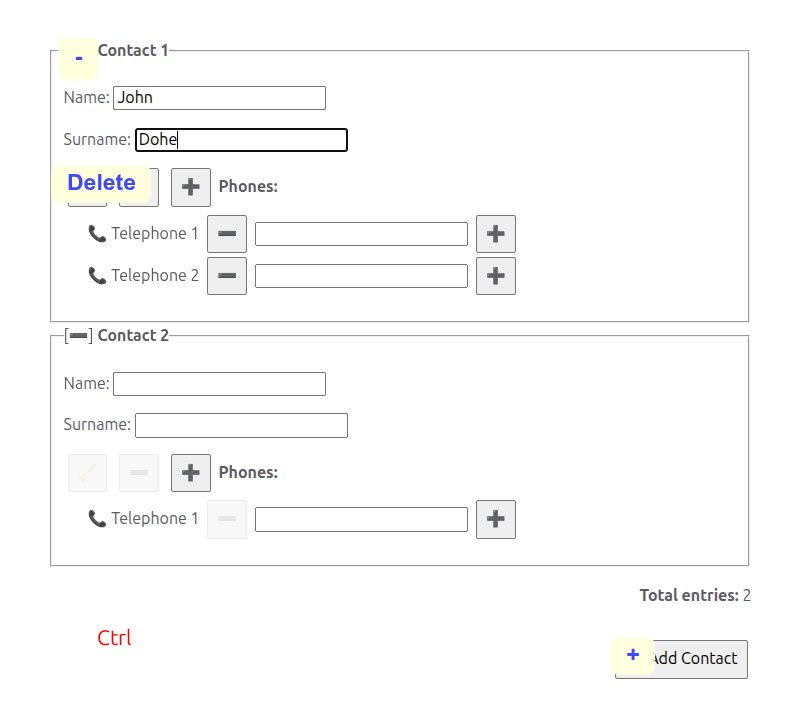
Try it now! If you’re filling out a form, hold down Ctrl to see what shortcuts are available.
SmarkForm uses an intelligent, context-aware hotkey system that makes forms intuitive and efficient:
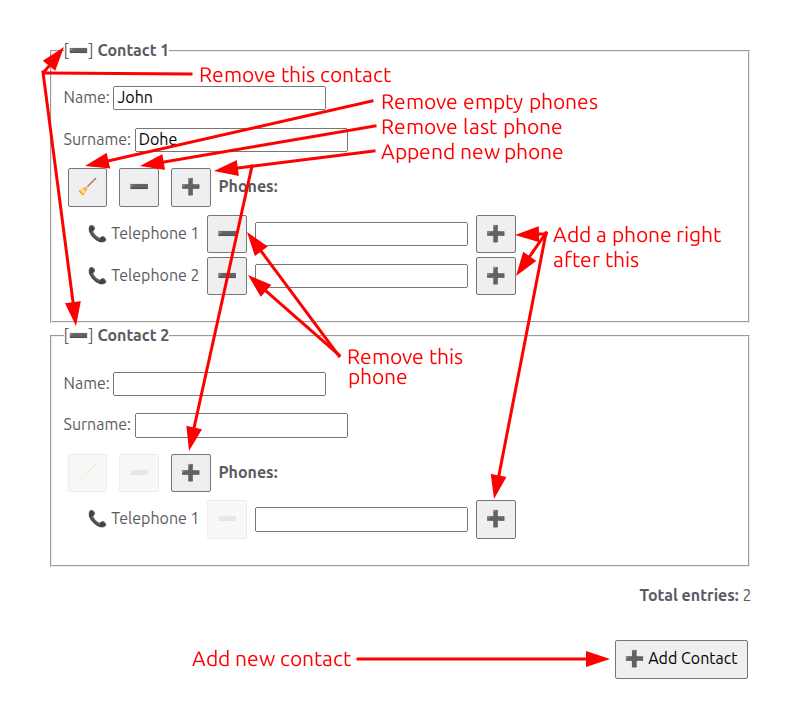
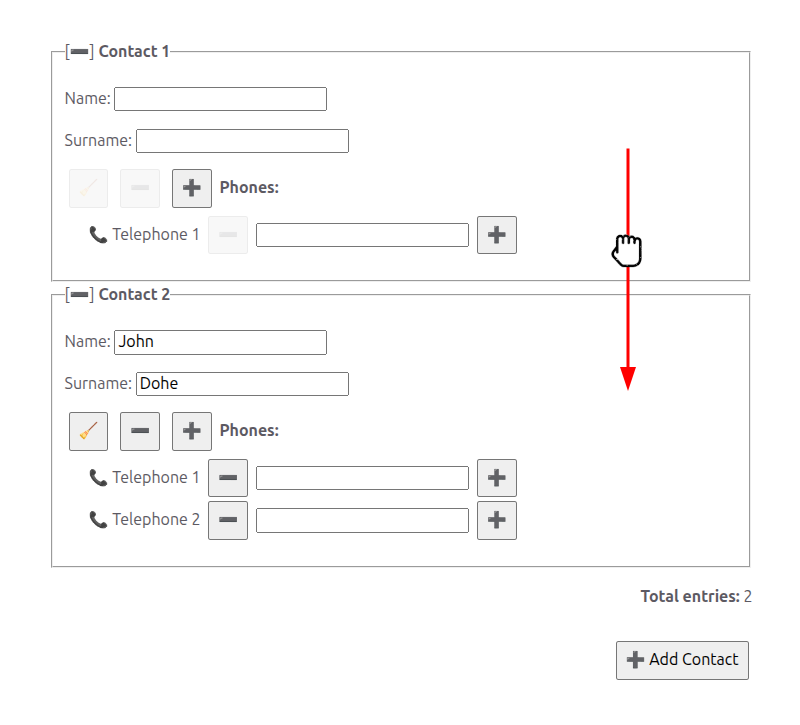
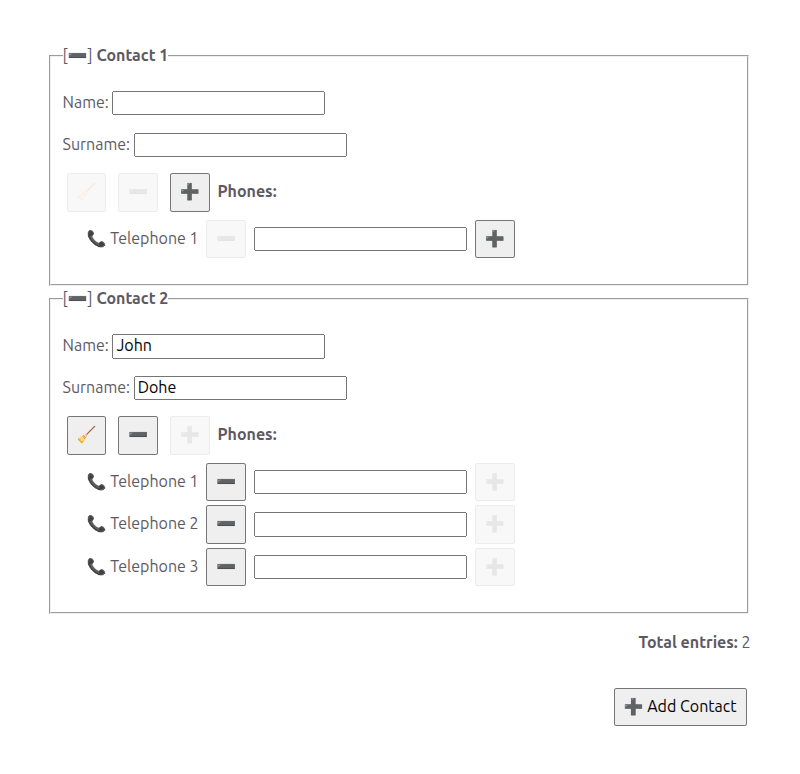
The same hotkey can be used in different parts of the form. For example, many forms use + to add items and − to remove items. If your form has multiple lists (like a list of contacts, each with their own list of phone numbers), the same + hotkey can be used for all of them without conflicts.
SmarkForm automatically picks the right action based on context. When you press a hotkey, SmarkForm triggers the action that’s most relevant to where you’re currently focused in the form. If you’re focused on a phone number field, Ctrl+Plus adds a new phone number. The system always chooses the nearest action to your current position.
This context-aware behavior means you can learn just a few simple hotkeys (like +, −, and Delete) and use them throughout the entire form in a natural, intuitive way.

Example: Imagine filling out a contact list where each contact has their own list of phone numbers. When you’re focused on a phone field, Ctrl+Plus adds another phone number to that contact. The same hotkey is reused naturally across different contexts!
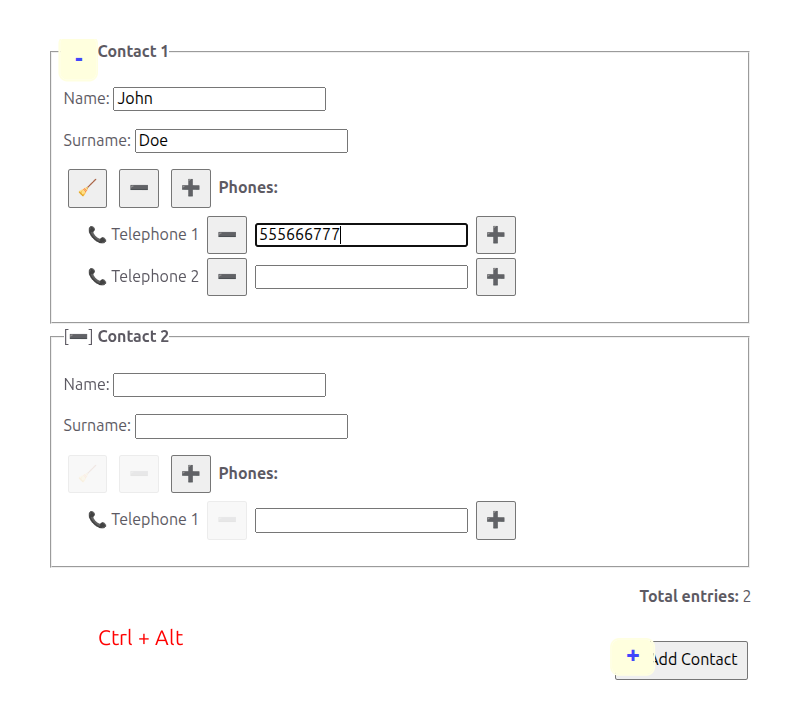
Sometimes you need to access an action in an outer context. For instance, while filling in a phone number, you might want to add a new contact (outer context) rather than another phone number (current context).
To access second-level hotkeys, hold Ctrl+Alt together (or Cmd+Alt on Mac).
This reveals hotkeys from the next level up in the form hierarchy. In our contact list example:
This two-level system keeps the interface clean while giving you keyboard access to everything.
Try it: Hold Ctrl to see nearby actions, then also hold Alt to reveal actions from the outer context. It’s more intuitive in practice than in words!
While the actual hotkeys available depend on how each form is configured, here are some patterns you’ll frequently encounter:
Remember: hold Ctrl to discover what’s available in any specific form. The hints will show you exactly which shortcuts you can use. Also, holding Ctrl+Alt may reveal additional shortcuts for the same keys from the outer context.
Many forms include dynamic lists where you can add, remove, or reorder items.
Look for buttons with plus (+) or minus (−) icons, or use hotkeys if configured:
Finding hotkeys: Hold Ctrl to see which keyboard shortcuts are available for the specific form you’re using. The actual hotkeys depend on how the form was designed.
Empty items: SmarkForm often creates a new empty item automatically when you start filling in the last one, so you can keep adding data smoothly.
Some forms allow you to reorder list items by dragging and dropping. The way you grab an item to drag it depends on how the form was designed:
With a drag handle — Many forms include a dedicated drag handle, often displayed as a ☰ icon or a similar visual cue. Grab that handle to drag the item. The rest of the item (including any text fields) behaves normally: you can still click, focus, and select text inside those fields without accidentally starting a drag.
Without a drag handle — If no drag handle is present, the entire item is draggable. You can click and hold anywhere on the item (except inside text inputs or buttons) to start dragging.
In both cases:
Note: Not all lists allow for reordering. This feature is enabled based on the specific use case and requirements of each form.
Some lists have minimum or maximum limits for a reason:
These limits are intentional constraints based on the form’s requirements. When a button is disabled, it means you’ve reached a limit — you can still modify existing items, but cannot add more or remove required ones. You can be presented with an empty item to fill in because it is expected to usually be at least 1 item, but you can remove it if the minimum is 0. If you just leave the fields blank, validation could fail. If you remove the item, it is more intentional -you are explicitly saying “There is no such item”. This way the validation can be more accurate and helpful.
Some forms use collapsible sections — areas that can be expanded or collapsed to help you focus on what matters and keep the form tidy. These are typically built with the browser’s native <details> element, which shows or hides its contents when you click its heading (the <summary> area).
SmarkForm extends its keyboard navigation to work naturally with collapsible sections:
Enter — When a collapsible section is closed, pressing Enter while in its summary field skips the hidden fields inside and moves directly to the next visible field. This keeps navigation smooth when you don’t need to edit the collapsed content.
Shift+Enter — Backward navigation is fully symmetric: pressing Shift+Enter when a closed section lies before you also skips its hidden fields and lands on the last visible field of that section (i.e. the summary field), without opening it.
Alt+Enter — When a collapsible section is closed and you want to navigate forward into its hidden fields, hold Alt while pressing Enter. The section opens automatically and focus moves to the first field inside, so you can edit it without reaching for the mouse.
Alt+Shift+Enter — The backward equivalent of Alt+Enter: hold Alt+Shift while pressing Enter to open the previous closed section and land on its last field, ready to continue filling in backwards.
Space — In the summary field of a collapsible section, pressing Space types a space character as usual. The section is not toggled, so you can freely type in the visible field without accidentally collapsing it.
Shift+Space — Hold Shift while pressing Space to fold or toggle the section without typing a space character:
<summary>): toggles the section open or closed.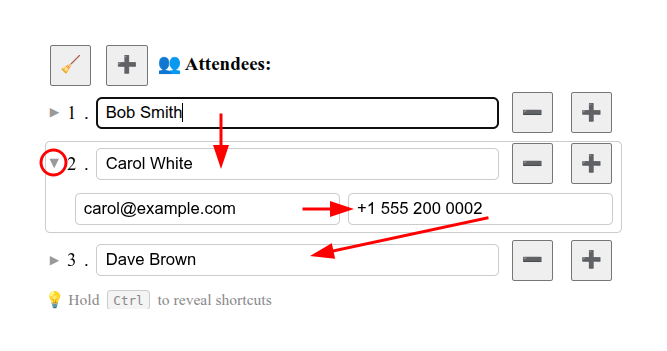
Tip: If a form shows contacts (or other items) as collapsible rows, keep sections closed while scanning the list and use Alt+Enter / Alt+Shift+Enter only when you need to edit a specific item’s details. This keeps the form compact and easy to read.
Note: Not all forms use collapsible sections. This feature is visible only when the form designer has chosen to wrap sections in
<details>elements.
Some forms have sections nested within other sections (like contact details within a contact, or items within an order). From your perspective as a user, these work seamlessly:
Pro tip: You don’t need to think about the form’s internal structure — just navigate naturally and SmarkForm handles the rest!
SmarkForm is designed with accessibility in mind, though we’re continuously working to improve:
autoscroll is enabled) scrolls it into view, so you never lose your place.disabled property on trigger buttons when their action is not available (e.g., when a list has reached its minimum or maximum items). The visual styling of disabled buttons is the developer’s responsibility via CSS.Using assistive technologies? We’re committed to making SmarkForm accessible to everyone. If you encounter any accessibility issues, please report them so we can continue improving!
Here are some tips to make form filling even faster:
Learn the discovery shortcut — Hold Ctrl to see available hotkeys anytime you’re unsure what actions are available
Use Enter to navigate — It’s faster than Tab for moving between fields, and it skips non-field elements
Master a few common hotkeys — Once you learn hotkeys for common actions (like adding/removing list items), you can use them throughout the form
Try second-level hotkeys — Hold Ctrl+Alt to access outer context actions when working with nested structures
Watch for smart features — Notice how buttons disable themselves when limits are reached, or how new list items appear automatically. Lists of complex forms may provide a button to duplicate an item (huge time saver sometimes), etc…
Use Alt+Enter / Alt+Shift+Enter and Shift+Space in collapsible sections — When a section is collapsed, Alt+Enter opens it and moves focus to the first field inside; Alt+Shift+Enter opens it and moves focus to the last field inside; Shift+Space toggles it open/closed from the header row, or folds it and returns focus to the header when you are editing a field in the expanded body
Use the keyboard for everything — Once you’re comfortable with navigation and hotkeys, you can often complete entire forms without touching your mouse
Context-aware shortcuts are a feature — The same hotkey doing different things in different sections is intentional and makes the interface more intuitive
🎯 Want to see SmarkForm in action? Check out the Examples section to explore interactive demonstrations of all these features.
💻 Are you a developer? See the Showcase section for in-depth examples with code, or visit the Branding page to learn how to link to this guide from your own forms.
This guide covers the core user-facing features of SmarkForm-powered forms. The specific features available in any given form depend on how the developer has implemented it.
Questions or issues? Visit the Support page to get help.